2019年8月30日 星期五

How to: Determine which .NET Framework versions are installed

How to: Determine which .NET Framework versions are installed

Users can install and run multiple versions of the .NET Framework on their computers. When you develop or deploy your app, you might need to know which .NET Framework versions are installed on the user’s computer.
The .NET Framework consists of two main components, which are versioned separately:
  • A set of assemblies, which are collections of types and resources that provide the functionality for your apps. The .NET Framework and assemblies share the same version number.
  • The common language runtime (CLR), which manages and executes your app's code. The CLR is identified by its own version number (see Versions and Dependencies).
 Note
Each new version of the .NET Framework retains features from the previous versions and adds new features. You can load multiple versions of the .NET Framework on a single computer at the same time, which means that you can install the .NET Framework without having to uninstall previous versions. In general, you shouldn't uninstall previous versions of the .NET Framework, because an application you use may depend on a specific version and may break if that version is removed.
There is a difference between the .NET Framework version and the CLR version:
  • The .NET Framework version is based on the set of assemblies that form the .NET Framework class library. For example, .NET Framework versions include 4.5, 4.6.1, and 4.7.2.
  • The CLR version is based on the runtime on which .NET Framework applications execute. A single CLR version typically supports multiple .NET Framework versions. For example, CLR version 4.0.30319.xxxxx supports .NET Framework versions 4 through 4.5.2, where xxxxx is less than 42000, and CLR version 4.0.30319.42000 supports .NET Framework versions starting with .NET Framework 4.6.
For more information about versions, see .NET Framework versions and dependencies.
To get a list of the .NET Framework versions installed on a computer, you access the registry. You can either use the Registry Editor to view the registry or use code to query it:
To get a list of the CLR versions installed on a computer, use a tool or code:
For information about detecting the installed updates for each version of the .NET Framework, see How to: Determine which .NET Framework updates are installed.

Find newer .NET Framework versions (4.5 and later)

Find .NET Framework versions 4.5 and later in the registry

  1. From the Start menu, choose Run, enter regedit, and then select OK.
    You must have administrative credentials to run regedit.
  2. In the Registry Editor, open the following subkey: HKEY_LOCAL_MACHINE\SOFTWARE\Microsoft\NET Framework Setup\NDP\v4\Full. If the Full subkey isn't present, then you don't have the .NET Framework 4.5 or later installed.
     Note
    The NET Framework Setup folder in the registry does not begin with a period.
  3. Check for a DWORD entry named Release. If it exists, then you have .NET Framework 4.5 or later versions installed. Its value is a release key that corresponds to a particular version of the .NET Framework. In the following figure, for example, the value of the Release entry is 378389, which is the release key for .NET Framework 4.5.
    Registry entry for the .NET Framework 4.5
The following table lists the value of the Release DWORD on individual operating systems for .NET Framework 4.5 and later versions.
 Important
The following table lists the keys of released versions of the .NET Framework only. It doesn't list the keys of preview or pre-release versions.
.NET Framework versionValue of the Release DWORD
.NET Framework 4.5All Windows operating systems: 378389
.NET Framework 4.5.1On Windows 8.1 and Windows Server 2012 R2: 378675
On all other Windows operating systems: 378758
.NET Framework 4.5.2All Windows operating systems: 379893
.NET Framework 4.6On Windows 10: 393295
On all other Windows operating systems: 393297
.NET Framework 4.6.1On Windows 10 November Update systems: 394254
On all other Windows operating systems (including Windows 10): 394271
.NET Framework 4.6.2On Windows 10 Anniversary Update and Windows Server 2016: 394802
On all other Windows operating systems (including other Windows 10 operating systems): 394806
.NET Framework 4.7On Windows 10 Creators Update: 460798
On all other Windows operating systems (including other Windows 10 operating systems): 460805
.NET Framework 4.7.1On Windows 10 Fall Creators Update and Windows Server, version 1709: 461308
On all other Windows operating systems (including other Windows 10 operating systems): 461310
.NET Framework 4.7.2On Windows 10 April 2018 Update and Windows Server, version 1803: 461808
On all Windows operating systems other than Windows 10 April 2018 Update and Windows Server, version 1803: 461814
.NET Framework 4.8On Windows 10 May 2019 Update: 528040
On all others Windows operating systems (including other Windows 10 operating systems): 528049
You can use these values as follows:
  • To determine whether a specific version of the .NET Framework is installed on a particular version of the Windows operating system, test whether the Release DWORD value is equal to the value listed in the table. For example, to determine whether .NET Framework 4.6 is present on a Windows 10 system, test for the a Release value that is equal to 393295.
  • To determine whether a minimum version of the .NET Framework is present, use the smaller RELEASE DWORD value for that version. For example, if your application runs under .NET Framework 4.6 or a later version, test for a RELEASE DWORD value that is greater than or equal to 393295. For a table that lists only the minimum RELEASE DWORD value for each .NET Framework version, see The minimum values of the Release DWORD for .NET Framework 4.5 and later versions.
  • To test for multiple versions, begin by testing for a value that is greater than or equal to the smaller DWORD value for the latest .NET Framework version, and then compare the value with the smaller DWORD value for each successive earlier version. For example, if your application requires .NET Framework 4.7 or later and you want to determine the specific version of .NET Framework present, start by testing for a RELEASE DWORD value that is great than or equal to to 461808 (the smaller DWORD value for .NET Framework 4.7.2). Then compare the RELEASE DWORD value with the smaller value for each later .NET Framework version. For a table that lists only the minimum RELEASE DWORD value for each .NET Framework version, see The minimum values of the Release DWORD for .NET Framework 4.5 and later versions.

Find .NET Framework versions 4.5 and later with code

  1. Use the RegistryKey.OpenBaseKey and RegistryKey.OpenSubKey methods to access the HKEY_LOCAL_MACHINE\SOFTWARE\Microsoft\NET Framework Setup\NDP\v4\Full subkey in the Windows registry.
    The existence of the Release DWORD entry in the HKEY_LOCAL_MACHINE\SOFTWARE\Microsoft\NET Framework Setup\NDP\v4\Full subkey indicates that the .NET Framework 4.5 or a later version is installed on a computer.
  2. Check the value of the Release entry to determine the installed version. To be forward-compatible, check for a value greater than or equal to the value listed in the .NET Framework version table.
The following example checks the value of the Release entry in the registry to find the .NET Framework 4.5 and later versions that are installed:
C#
using System;
using Microsoft.Win32;

public class GetDotNetVersion
{
   public static void Main()
   {
      Get45PlusFromRegistry();
   }

   private static void Get45PlusFromRegistry()
   {
      const string subkey = @"SOFTWARE\Microsoft\NET Framework Setup\NDP\v4\Full\";

      using (var ndpKey = RegistryKey.OpenBaseKey(RegistryHive.LocalMachine, RegistryView.Registry32).OpenSubKey(subkey))
      {
        if (ndpKey != null && ndpKey.GetValue("Release") != null) {
            Console.WriteLine($".NET Framework Version: {CheckFor45PlusVersion((int) ndpKey.GetValue("Release"))}");
        }
         else {
            Console.WriteLine(".NET Framework Version 4.5 or later is not detected.");
         } 
      }
   
      // Checking the version using >= enables forward compatibility.
      string CheckFor45PlusVersion(int releaseKey)
      {
         if (releaseKey >= 528040)
            return "4.8 or later";
         if (releaseKey >= 461808)
            return "4.7.2";
         if (releaseKey >= 461308)
            return "4.7.1";
         if (releaseKey >= 460798)
            return "4.7";
         if (releaseKey >= 394802)
            return "4.6.2";
         if (releaseKey >= 394254)
            return "4.6.1";      
         if (releaseKey >= 393295)
            return "4.6";      
         if (releaseKey >= 379893)
            return "4.5.2";      
         if (releaseKey >= 378675)
            return "4.5.1";      
         if (releaseKey >= 378389)
            return "4.5";      
         // This code should never execute. A non-null release key should mean
         // that 4.5 or later is installed.
         return "No 4.5 or later version detected";
      }
   }
}   
// This example displays output like the following:
//       .NET Framework Version: 4.6.1
This example follows the recommended practice for version checking:
  • It checks whether the value of the Release entry is greater than or equal to the value of the known release keys.
  • It checks in order from most recent version to earliest version.

Check for a minimum-required .NET Framework version (4.5 and later) with PowerShell

  • Use PowerShell commands to check the value of the Release entry of the HKEY_LOCAL_MACHINE\SOFTWARE\Microsoft\NET Framework Setup\NDP\v4\Full subkey.
The following examples check the value of the Release entry to determine whether the .NET Framework 4.6.2 or later is installed. This code returns True if it's installed and False otherwise.
PowerShell
# PowerShell 5
 Get-ChildItem 'HKLM:\SOFTWARE\Microsoft\NET Framework Setup\NDP\v4\Full\' |  Get-ItemPropertyValue -Name Release | Foreach-Object { $_ -ge 394802 }
PowerShell
# PowerShell 4
(Get-ItemProperty "HKLM:SOFTWARE\Microsoft\NET Framework Setup\NDP\v4\Full").Release -ge 394802
To check for a different minimum-required .NET Framework version, replace 394802 in these examples with a Release value from the .NET Framework version table.

Find older .NET Framework versions (1–4)

Find .NET Framework versions 1–4 in the registry

  1. From the Start menu, choose Run, enter regedit, and then select OK.
    You must have administrative credentials to run regedit.
  2. In the Registry Editor, open the following subkey: HKEY_LOCAL_MACHINE\SOFTWARE\Microsoft\NET Framework Setup\NDP:
    • For .NET Framework versions 1.1 through 3.5, each installed version is listed as a subkey under the HKEY_LOCAL_MACHINE\SOFTWARE\Microsoft\NET Framework Setup\NDP subkey. For example, HKEY_LOCAL_MACHINE\SOFTWARE\Microsoft\NET Framework Setup\NDP\v3.5. The version number is stored as a value in the version subkey's Version entry.
    • For .NET Framework 4, the Version entry is under the HKEY_LOCAL_MACHINE\SOFTWARE\Microsoft\NET Framework Setup\NDP\v4.0\Client subkey, the HKEY_LOCAL_MACHINE\SOFTWARE\Microsoft\NET Framework Setup\NDP\v4.0\Full subkey, or under both subkeys.
     Note
    The NET Framework Setup folder in the registry does not begin with a period.
    The following figure shows the subkey and its Version entry for the .NET Framework 3.5.
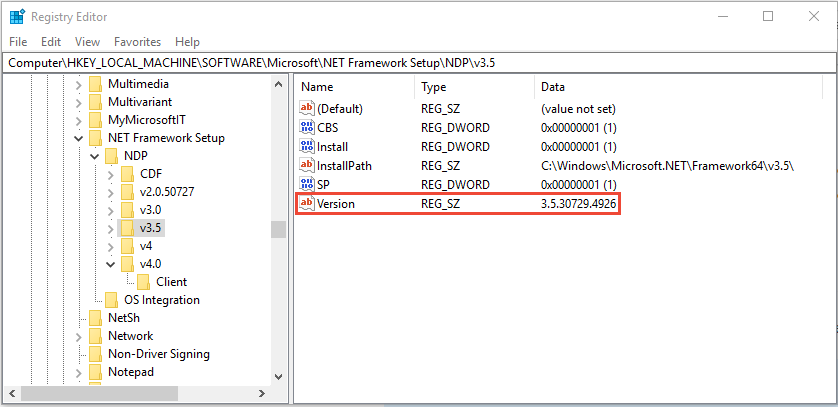
    The registry entry for the .NET Framework 3.5.

Find .NET Framework versions 1–4 with code

  • Use the Microsoft.Win32.RegistryKey class to access the HKEY_LOCAL_MACHINE\Software\Microsoft\NET Framework Setup\NDP subkey in the Windows registry.
The following example finds the .NET Framework 1–4 versions that are installed:
C#
using Microsoft.Win32;
using System;

public static class VersionTest
{
    public static void Main()
    {
        GetVersionFromRegistry();
    }
    
    private static void GetVersionFromRegistry()
    {
        // Opens the registry key for the .NET Framework entry.
        using (RegistryKey ndpKey = 
                RegistryKey.OpenBaseKey(RegistryHive.LocalMachine, RegistryView.Registry32).
                OpenSubKey(@"SOFTWARE\Microsoft\NET Framework Setup\NDP\"))
        {
            foreach (var versionKeyName in ndpKey.GetSubKeyNames())
            {
                // Skip .NET Framework 4.5 version information.
                if (versionKeyName == "v4")
                {
                    continue;
                }

                if (versionKeyName.StartsWith("v"))
                {

                    RegistryKey versionKey = ndpKey.OpenSubKey(versionKeyName);
                    // Get the .NET Framework version value.
                    var name = (string)versionKey.GetValue("Version", "");
                    // Get the service pack (SP) number.
                    var sp = versionKey.GetValue("SP", "").ToString();

                    // Get the installation flag, or an empty string if there is none.
                    var install = versionKey.GetValue("Install", "").ToString();
                    if (string.IsNullOrEmpty(install)) // No install info; it must be in a child subkey.
                        Console.WriteLine($"{versionKeyName}  {name}");
                    else
                    {
                        if (!(string.IsNullOrEmpty(sp)) && install == "1")
                        {
                            Console.WriteLine($"{versionKeyName}  {name}  SP{sp}");
                        }
                    }
                    if (! string.IsNullOrEmpty(name))
                    {
                        continue;
                    }
                    foreach (var subKeyName in versionKey.GetSubKeyNames())
                    {
                        RegistryKey subKey = versionKey.OpenSubKey(subKeyName);
                        name = (string)subKey.GetValue("Version", "");
                        if (! string.IsNullOrEmpty(name))
                            sp = subKey.GetValue("SP", "").ToString();
                        
                        install = subKey.GetValue("Install", "").ToString();
                        if (string.IsNullOrEmpty(install)) //No install info; it must be later.
                            Console.WriteLine($"{versionKeyName}  {name}");
                        else
                        {
                            if (!(string.IsNullOrEmpty(sp )) && install == "1")
                            {
                                Console.WriteLine($"{subKeyName}  {name}  SP{sp}");
                            }
                            else if (install == "1")
                            {
                                Console.WriteLine($"  {subKeyName}  {name}");
                            }
                        }
                    }
                }
            }
        }
    }
}
// The example displays output similar to the following:
//        v2.0.50727  2.0.50727.4927  SP2
//        v3.0  3.0.30729.4926  SP2
//        v3.5  3.5.30729.4926  SP1
//        v4.0
//        Client  4.0.0.0

Find CLR versions

Find the current CLR version with Clrver.exe

Use the CLR Version tool (Clrver.exe) to determine which versions of the CLR are installed on a computer:

Find the current CLR version with the Environment class

 Important
For the .NET Framework 4.5 and later versions, don't use the Environment.Version property to detect the version of the CLR. Instead, query the registry as described in Find .NET Framework versions 4.5 and later with code.
  1. Query the Environment.Version property to retrieve a Version object.
    The returned System.Version object identifies the version of the runtime that's currently executing the code. It doesn't return assembly versions or other versions of the runtime that may have been installed on the computer.
    For the .NET Framework versions 4, 4.5, 4.5.1, and 4.5.2, the string representation of the returned Version object has the form 4.0.30319.xxxxx, where xxxxx is less than 42000. For the .NET Framework 4.6 and later versions, it has the form 4.0.30319.42000.
  2. After you have the Version object, query it as follows:
    • For the major release identifier (for example, 4 for version 4.0), use the Version.Major property.
    • For the minor release identifier (for example, 0 for version 4.0), use the Version.Minor property.
    • For the entire version string (for example, 4.0.30319.18010), use the Version.ToString method. This method returns a single value that reflects the version of the runtime that's executing the code. It doesn't return assembly versions or other runtime versions that may be installed on the computer.
The following example uses the Environment.Version property to retrieve CLR version information:
C#
using System;

public class VersionTest
{
    public static void Main()
    {
        Console.WriteLine($"Version: {Environment.Version}");
    }
}
// The example displays output similar to the following:'
//    Version: 4.0.30319.18010

2019年8月29日 星期四

Force a program to run *without* administrator privileges or UAC

Method 1 (TEST OK)

Save to nonadmin.bat:
cmd /min /C "set __COMPAT_LAYER=RUNASINVOKER && start "" "%1""
Now you can drag and drop programs to this to run them without admin.
This doesn't require admin privileges as changing that registry key does. Also you won't clutter the context menu.


OR 

cmd /min /C "set __COMPAT_LAYER=RUNASINVOKER && start "" ""Program path"""

------------------------

How to Run Program without Admin Privileges and to Bypass UAC Prompt?

When started, many programs require permission elevation (shield on the app icon), but actually they don’t need the administrator privileges for their normal operation. For example, you can manually grant permissions for your users on the app folder in the ProgramFiles and/or registry hives used by the program. So when starting such a program under regular user account (if User Account Control is enabled on the computer), a UAC prompt will appear and the user will be required to enter an administrator password. To bypass this mechanism, many users simple disable UAC or grant admin privileges to a user on a computer by adding a user account to the local group “Administrators”. Of course, both methods are not safe.

Why some Windows apps not run under standard users and require administrator permissions?

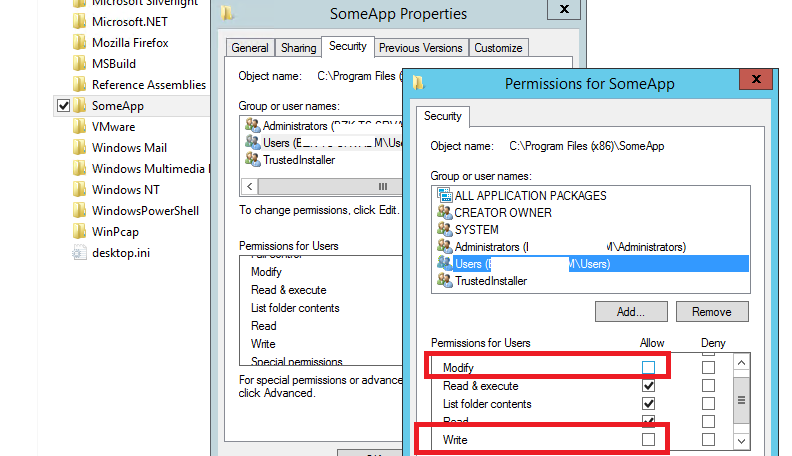
An app may need the administrator privileges to modify some files (logs, configs, etc.) in its own folder in the C:\Program Files (x86)\SomeApp. By default, users don’t have edit (write and modify) permissions on this directory. In order this program to work normally, the administrator permissions are required. To solve this problem, you have to manually grant the modify and/or write permission for a user (or the Users group) on the app folder at the NTFS level.
assigning edit permissions on folder for regular users
How to run a program that requires admin privileges under standard user?
Earlier we described how to disable a UAC prompt for the certain app using RunAsInvoker parameter. However, this method is not flexible enough. You can also use RunAs with the saved administrator password using the /SAVECRED option (not safe as well). Let’s consider an easier way to force any program to run without administrator privileges (without entering the admin password) and with UAC enabled (Level 4, 3 or 2 of the UAC slider).
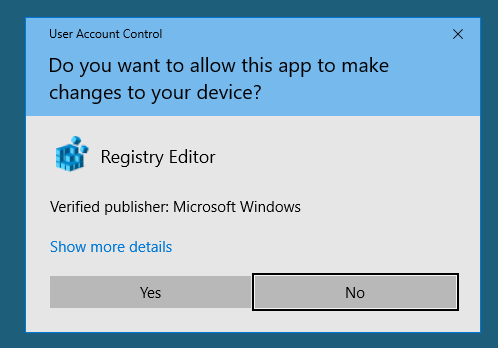
Let’s take the Registry Editor as an example — regedit.exe (it is located in the C:\Windows\ folder). When you start regedit.exe, the UAC window appears, and if you don’t confirm the elevation, the Registry Editor won’t run.
regedit - user account control request
Create the text file run-as-non-admin.bat containing the following code on your Desktop:
cmd /min /C "set __COMPAT_LAYER=RUNASINVOKER && start "" %1"
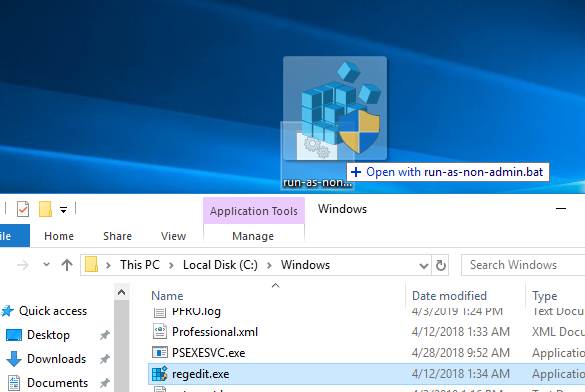
To force the regedit.exe to run without the administrator privileges and to suppress the UAC prompt, simple drag the EXE file you want to start to this BAT file on the desktop.
run a program under user with UAC prompt bypass
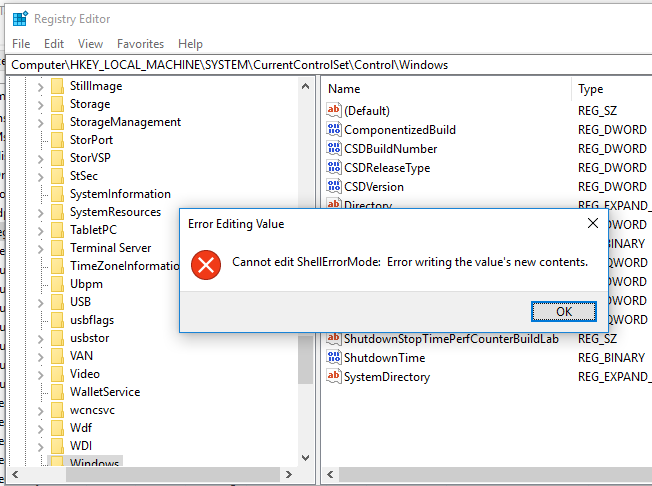
Then the Registry Editor should start without the UAC request. If you open the Task Manager and add the Elevated column, you will see that there is the regedit.exe process in the system without the elevated status (run with standard user permissions).
Try to edit any parameter in the HKLM registry hive. As you can see, a user cannot edit the registry in this registry key (the user doesn’t have write permissions to the system registry hives). But you can add or edit registry keys and parameters in your user branch — HKCU.
regedit run as standard user without admin rights
In the same way you can run any app using the BAT file. Just specify the path to the executable file.
run-app-as-non-admin.bat
Set ApplicationPath="C:\Program Files\SomeApp\testapp.exe"
cmd /min /C "set __COMPAT_LAYER=RUNASINVOKER && start "" %ApplicationPath%"
You can also add a context menu that allows to run all apps without elevation. To do it, create the following REG file and import into the registry.
Windows Registry Editor Version 5.00
[HKEY_CLASSES_ROOT\*\shell\forcerunasinvoker]
@="Run as user without UAC privilege elevation"
[HKEY_CLASSES_ROOT\*\shell\forcerunasinvoker\command]
@="cmd /min /C \"set __COMPAT_LAYER=RUNASINVOKER && start \"\" \"%1\"\""
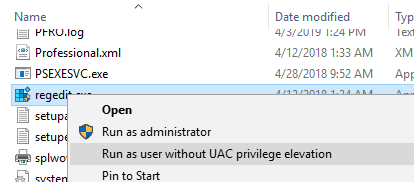
After that, to run any application without the administrator privileges, just select “Run as user without UAC privilege elevation” in the context menu.
Run program as user without UAC privilege elevation

__COMPAT_LAYER environment variable & RunAsInvoker parameter

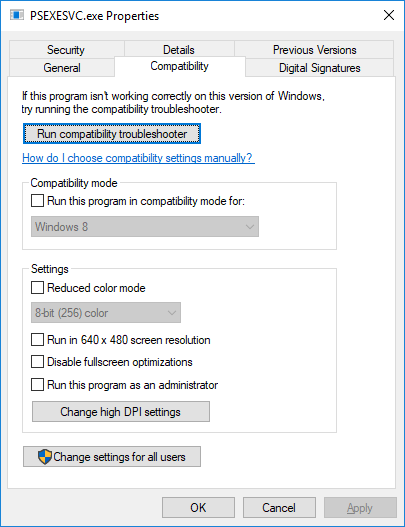
The environment variable __COMPAT_LAYER allows you to set different compatibility levels for the applications (the Compatibility tab in the properties of an EXE file). Using the variable, you can specify the compatibility settings to be used when starting a program. For example, to start an app in Windows 8 compatibility mode and 640×480 resolution, set the following:
set __COMPAT_LAYER=Win8RTM 640x480
run an ap in windows compatibility mode
The __COMPAT_LAYER variable has some options we are interested in. There are the following parameters:
  • RunAsInvoker – run an app with the privileges of a parent process without the UAC prompt;
  • RunAsHighest – run a program with the highest-level permission available to the user (the UAC prompt will appear if a user has the administrator privileges);
  • RunAsAdmin – run an app as administrator (the UAC prompt appears each time).
It means that the RunAsInvoker parameter does not provide the administrator permissions, but only blocks the UAC window.
===================================================
Methord 3
===================================================
Step 1 - Locate the username of the administrator account
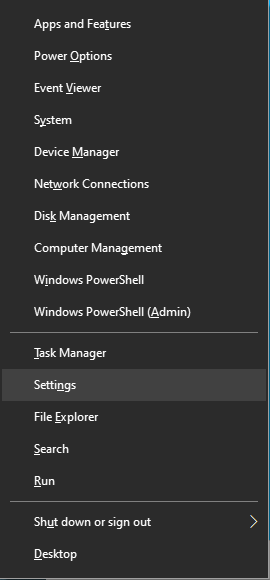
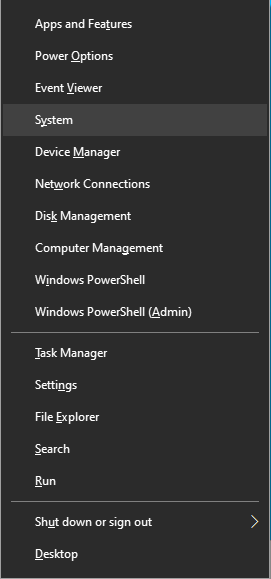
  1. When logged in as the Administrator account press the Windows Key + X.
  2. Select Settings.
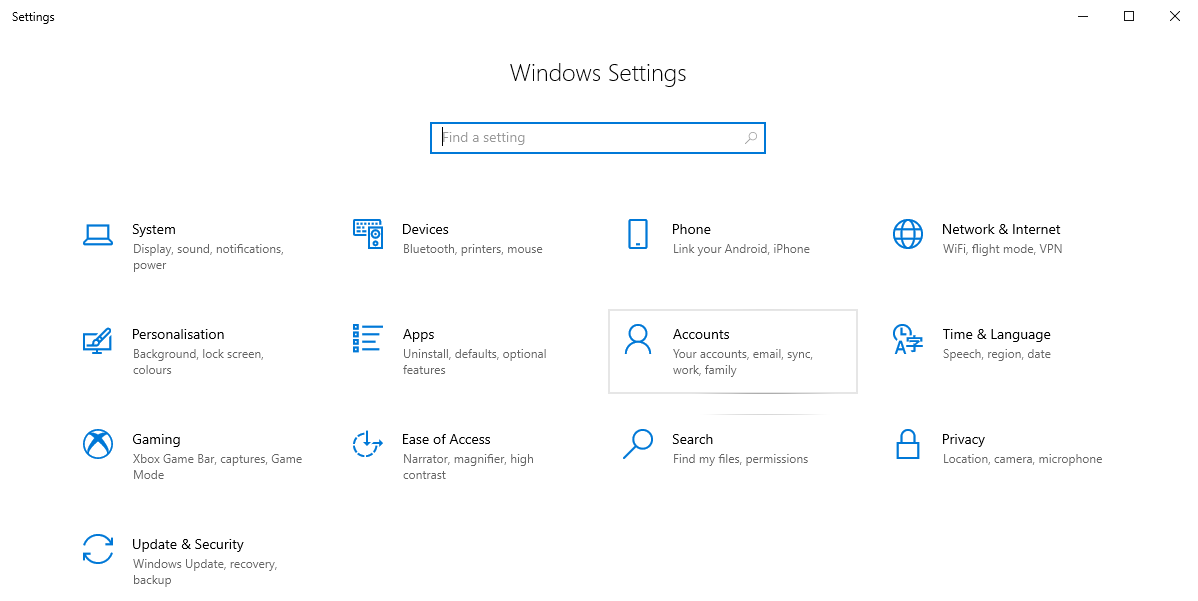
  3. Select Accounts.
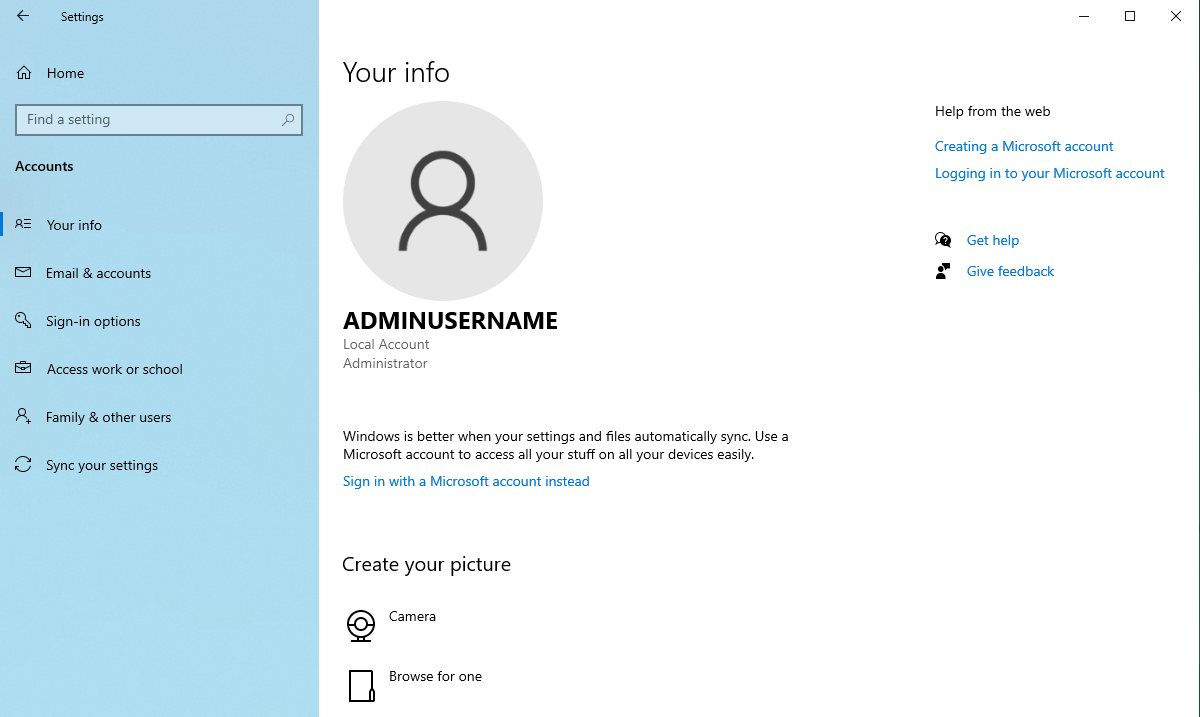
  4. Record the name of the account. In the image above it is AdminUsername.
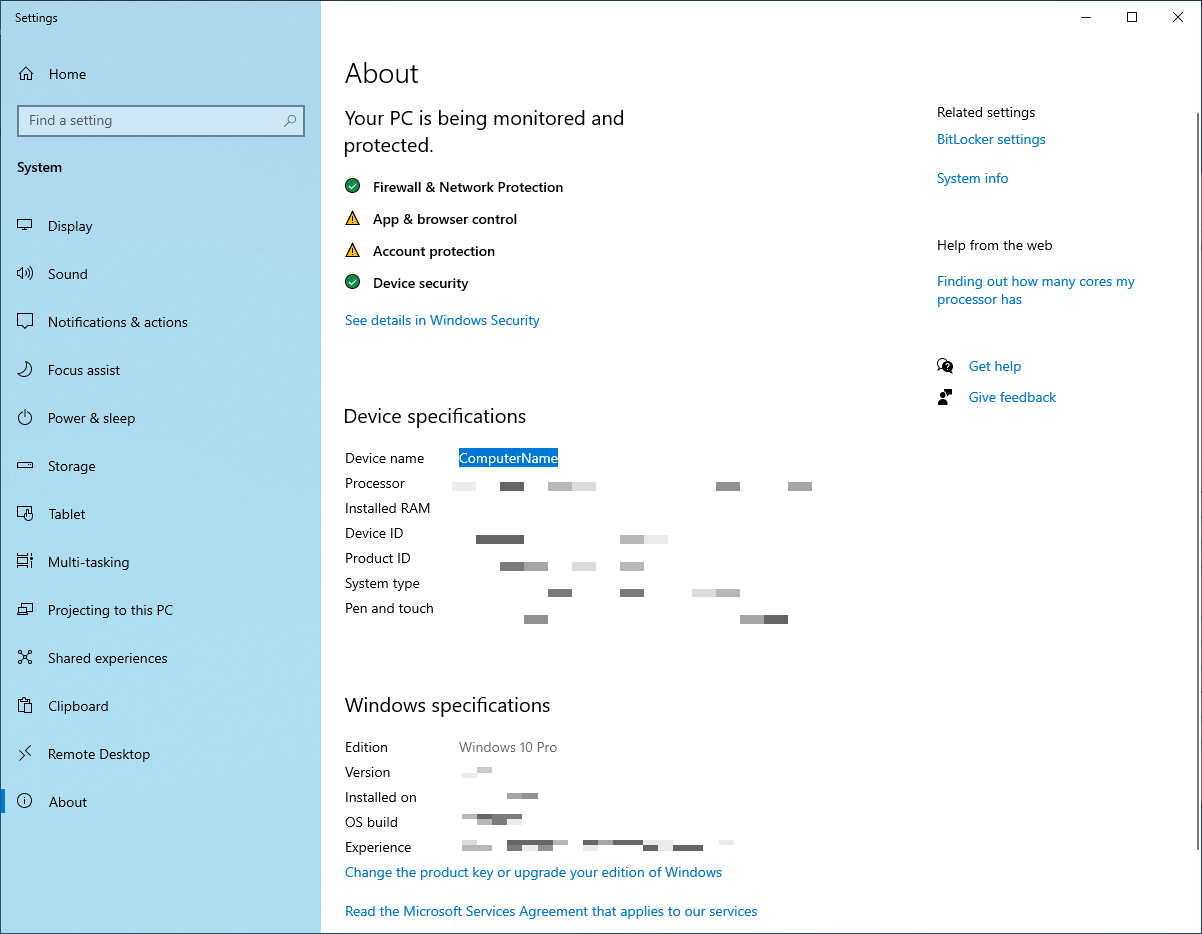
Step 2 - Locate the name of the Computer
  1. Press the Windows Key + X.
  2. Select System.
  3. Record the Device Name. In the image above it is ComputerName.
Step 3 - Create the Shortcut
  1. Log into the User Account you wish to use SmartPSS on.
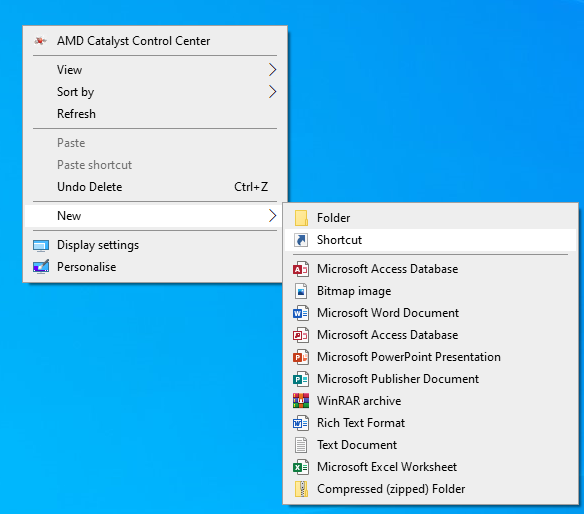
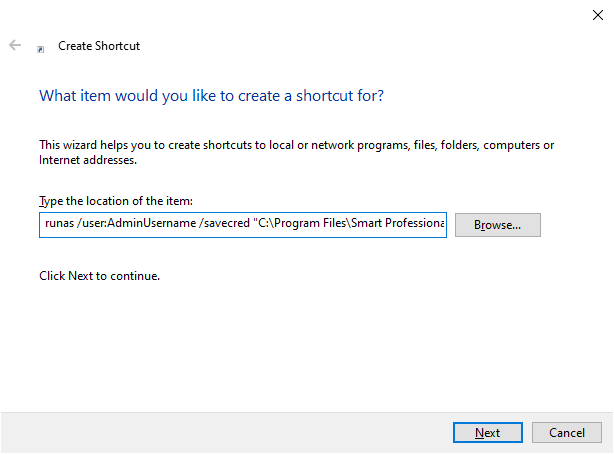
  2. On the desktop, right-click and select New Shortcut.
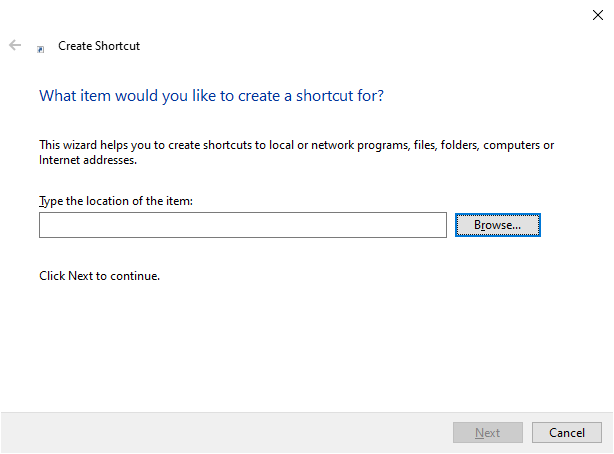
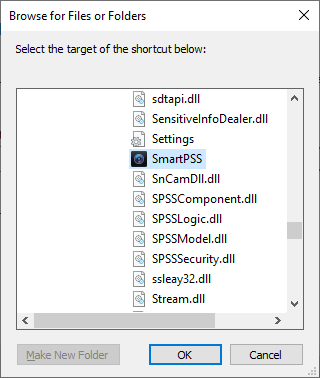
  3. Click Browse.
  4. Navigate to SmartPSS.exe and select it. Click OK.
    This is commonly located at located at C:\Program Files\Smart Professional Surveillance System\SmartPSS.

  5. Add runas /user:ComputerName\AdminUsername /savecred to the start of the file path. 
  6. Replace AdminUsername with the username of the administrator account found in Step 1.
  7. Replace ComputerName with the Device Name found in Step 2.
  8. Click Next.
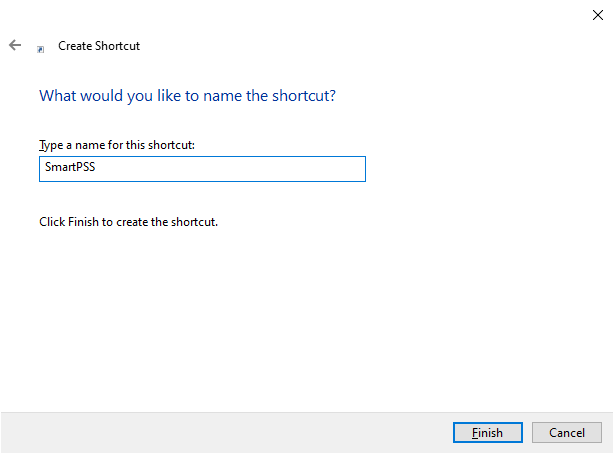
  9. Name the Shortcut, then click Finish.
Step 4 - Run the shortcut and enter the Administrator credentials.
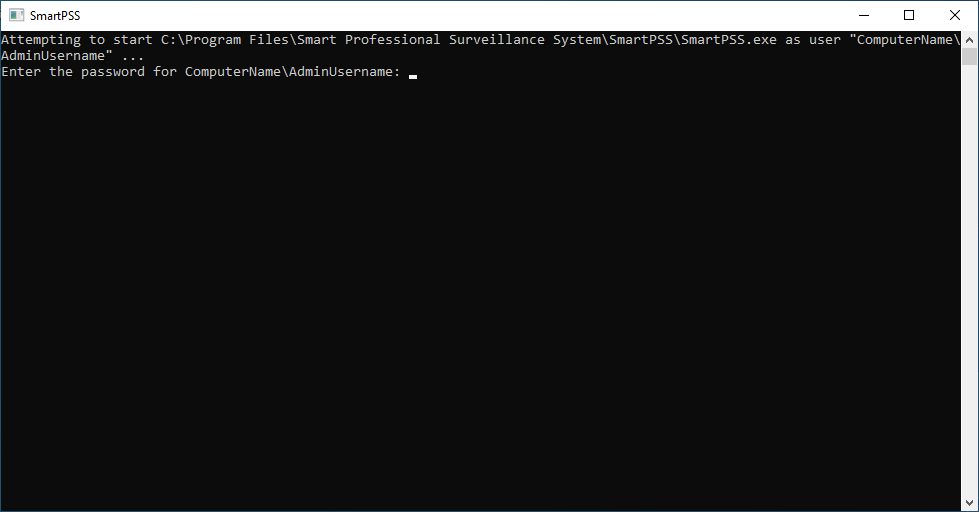
  1. Double-click on the Shortcut to run it.
  2. Enter the password for the administrator account, then press the Enter key.
    Please note that you will NOT be able to see the password as it is being typed in.
    You will only have to enter the admin password this once. It will be saved in the Windows Credential Manager from now on.
  3. SmartPSS will now open.
Step 5 (Optional) - Change the icon of the shortcut to use the SmartPSS icon.
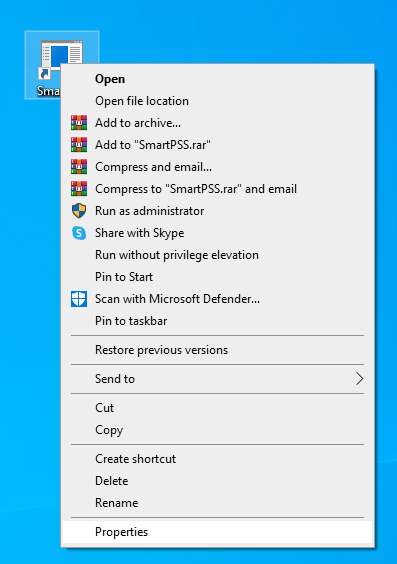
  1. Right-click on the shortcut.
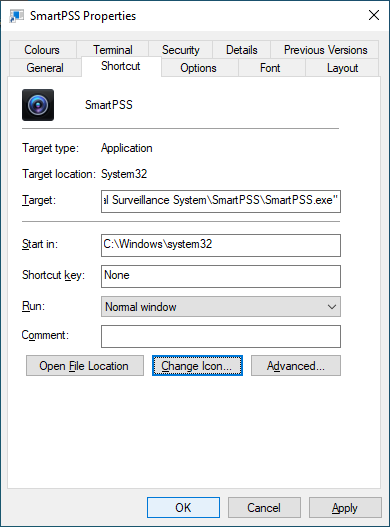
  2. Select Properties.
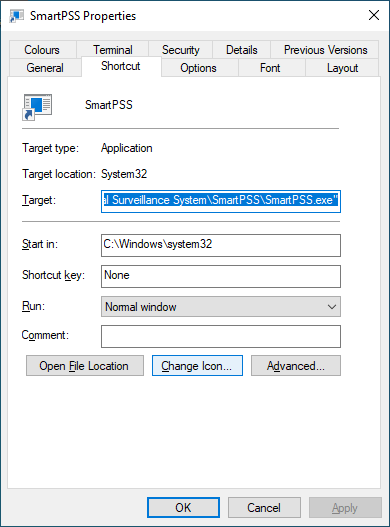
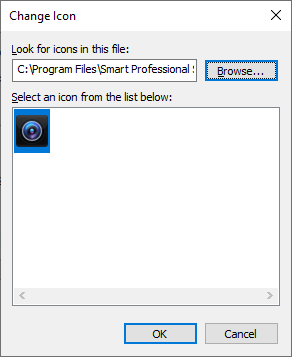
  3. Click Change Icon.
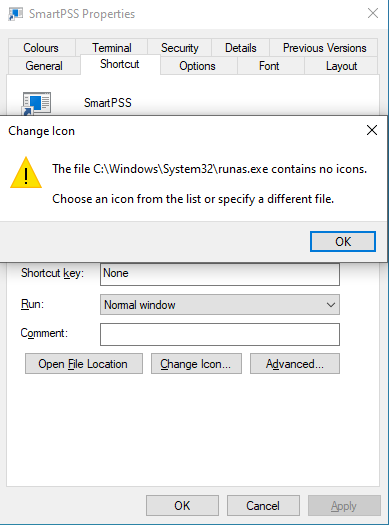
  4. Click OK.
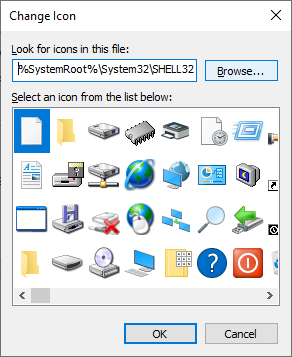
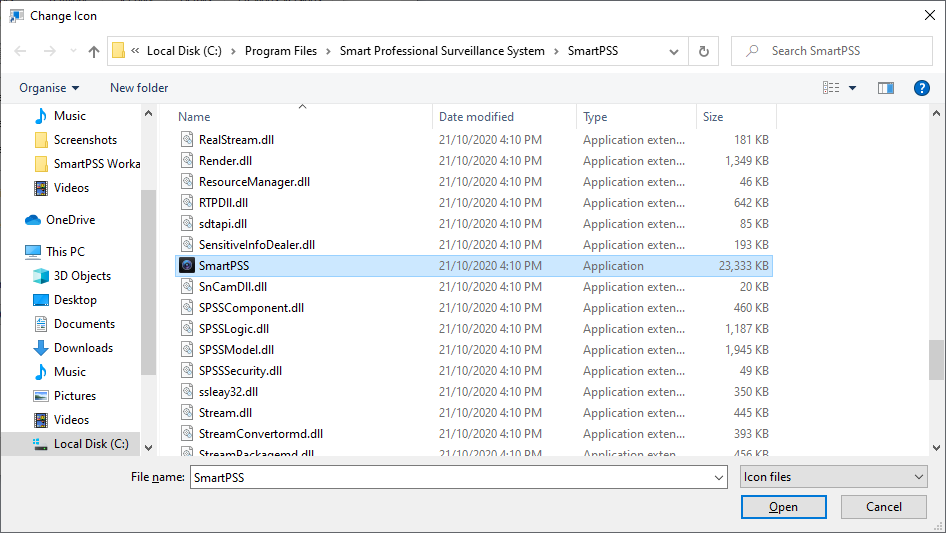
  5. Click Browse.
  6. Navigate to SmartPSS.exe and select it. Click Open.
    This is commonly located at located at C:\Program Files\Smart Professional Surveillance System\SmartPSS.

  7. Click OK.
  8. Click OK.
  9. Your Shortcut will now have the SmartPSS Icon.

2019年8月25日 星期日

優化Windows 10作業系統 PowerShell移除「核心」應用程式

裝了 Windows 10 作業系統,會發現它預載了不同應用程序,但這些應用程序卻未必每個人均合用,但 Microsoft 卻沒法不許用家在傳統的軟體卸載選單中移除,其實用家只需使用 PowerShell 就能把這些沒用又浪費空間的「核心」應用程序移走。

透過 Powershell ,用家能移除被定義為「核心」應用程序的套件,由於部份對於系統完整性非常重要,在進行優化前務必要了解它是否會影響到 Windows 10 的正常運作,對於並不清楚的程序最好是保留,否則只會搞到自已。

步驟︰

1. 在 Windows 10 的「執行」輸入「 Powershell 」並按 Enter ,將會進入「 Windows PowerShell 」程序。

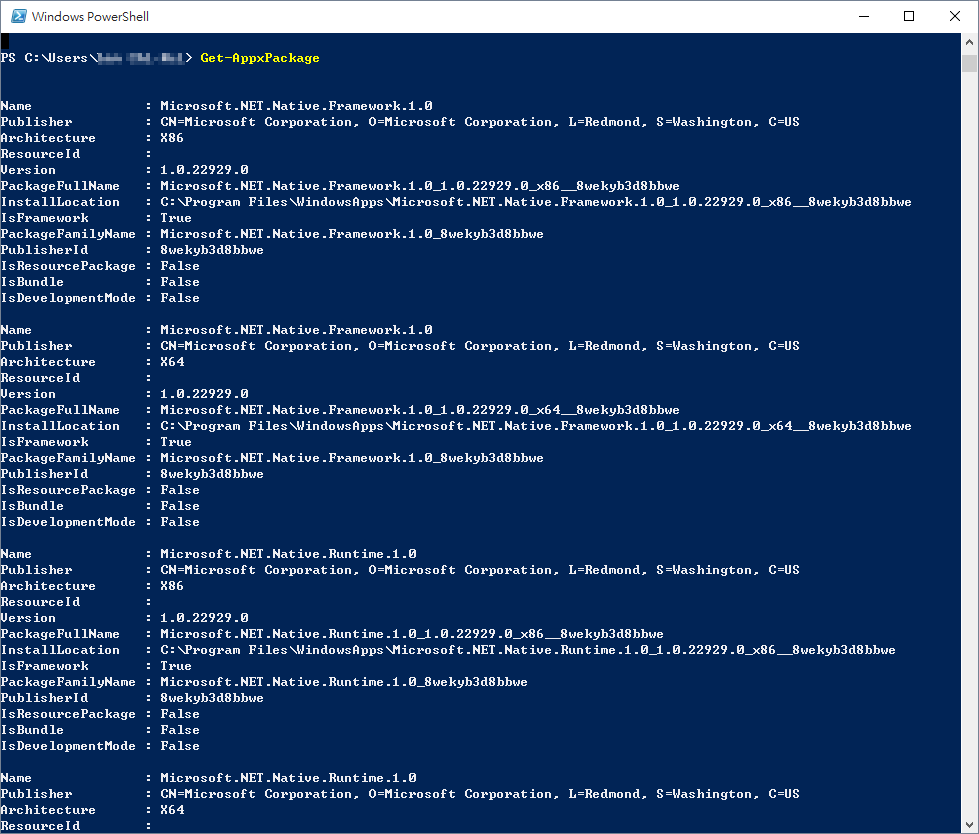
2. 在「 Windows PowerShell 」中鍵入「 Get-AppxPackage 」,就會顯示用家已安裝的 Windows 10 核心應用程式的名字。

3. 例如用家想解除 Microsoft Office OneNote ,要輸入其 PackageFullName ,在此例子為「 Microsoft.Office.OneNote_17.4229.10061.0_x64__8wekyb3d8bbwe 」。

4. 要移除此核心應用程序,在「 Windows PowerShell 」中鍵入「 Remove-AppxPackage Microsoft.Office.OneNote_17.4229.10061.0_x64__8wekyb3d8bbwe 」即可解除。

PowerShell

2019年8月5日 星期一

Batch script to find and delete registry keys and/or values

You can use a batch file with a single command line for this task:
@for %%I in ("tasksche" "Other Value" "One More Value") do @%SystemRoot%\System32\reg.exe delete "HKCU\SOFTWARE\Microsoft\Windows\CurrentVersion\Run" /v "%%~I" /f 2>nul
The internal command FOR runs external command REG for each string specified in parentheses which deletes the registry value from specified registry key.
REG would output an error message if the value to delete or the registry key itself does not exist. But this error message written to STDERR is redirected to device NUL to suppress it.
This single line batch file can be extended to read the registry values to delete from a text file and additionally output which registry value were found and successfully deleted.
@echo off
setlocal EnableExtensions DisableDelayedExpansion
set "CreatedListFile="
set "ListFile=%TEMP%\ListFile.txt"

if not exist "%ListFile%" (
    set "CreatedListFile=1"
    (
        echo tasksche
        echo Other Value
        echo "One More Value"
    ) >"%ListFile%"
)

for /F "usebackq delims=" %%I in ("%ListFile%") do (
    %SystemRoot%\System32\reg.exe delete "HKCU\SOFTWARE\Microsoft\Windows\CurrentVersion\Run" /v "%%~I" /f 2>nul
    if not errorlevel 1 echo Deleted "%%~I" from HKCU\SOFTWARE\Microsoft\Windows\CurrentVersion\Run
)

if defined CreatedListFile del "%ListFile%"
endlocal
Of course it is possible to run multiple reg delete in the command block executed by FOR. But please note that using reg delete for deletion of a value or key in HKLM requires administrative privileges, i.e. the batch file must be executed as administrator.
For understanding the used commands and how they work, open a command prompt window, execute there the following commands, and read entirely all help pages displayed for each command very carefully.
  • del /?
  • echo /?
  • endlocal /?
  • if /?
  • for /?
  • reg /?
  • reg delete /?
  • set /?
  • setlocal /?
Read also the Microsoft article about Using Command Redirection Operators explaining > used to create the list file and 2>nul used to suppress the error message.

2019年7月30日 星期二

Squid "Anti-Ad" Server Blocker


The proxy server Squid (Squid Web Proxy Cache) has the ability to read a list of ips from a text file and block those ips from clients using the proxy. This is perfect for blocking ad servers for your internal clients. Your clients in turn will not have to be bothered with ads, they will save bandwidth and you wont have to worry as much about that user that will click on any shiny animated object in front of them. This script works similarly to SafeSquid, but gives you full control of the list and allows for increased flexability.

Getting Started

The following three(3) lines need to be added anywhere in your squid.conf file. We are going to assume your squid.conf file is in /etc/squid/ and you will be putting your list of ad servers called ad_block.txt in the same directory.
NOTE: If you need assistance with Squid check out the Calomel.org Squid proxy "how to". You can also setup a proxy auto configuration (PAC) file in the browser using our Proxy Auto Config for Firefox (PAC) "how to".
The first line below is a comment and reminder where you are getting your list from. The second line is the regular expression that reads the "/etc/squid/ad_block.txt" file when the squid daemon loads or when you reconfigure the daemon with "squid -k reconfigure". The next line instructs squid to deny access to those ips in the list from clients using the squid proxy. The last line (deny_info) is optional, it just sends back a tcp rest to the client instead of sending an infomational error page. You may want this option if you do not want clients provided with any ifo about your proxy or why the error was triggered.
## disable ads ( http://pgl.yoyo.org/adservers/ )
acl ads dstdom_regex "/etc/squid/ad_block.txt"
http_access deny ads
#deny_info TCP_RESET ads

Fetching the list of ad servers

The next step is to fetch the list of known advertising hostnames and save them to a file so squid can read it. The following script uses curl to download the list from pgl.yoyo.org and save the list to a file in /etc/squid/ad_block.txt. The last line in the script tells squid to re-read the ad_block.txt list after the file is downloaded to load in any new ad servers.
#### Calomel.org  ad_servers_newlist.sh 
#
## get new ad server list
curl -sS -L --compressed "http://pgl.yoyo.org/adservers/serverlist.php?hostformat=nohtml&showintro=0&mimetype=plaintext" > /etc/squid/ad_block.txt 

## refresh squid
/usr/local/sbin/squid -k reconfigure

Automating with cron

Lastly, you may want to setup and cron job to get the latest list every few days. The site you get the ad list from (pgl.yoyo.org) updates their ips every 3 days or so on average. With a cron job running you can make sure you have the latest list. Below is a cron job line to get the ad servers list every 3 days at 5:35am (0535).
#minute (0-59)
#|   hour (0-23)
#|   |    day of the month (1-31)
#|   |    |   month of the year (1-12 or Jan-Dec)
#|   |    |   |   day of the week (0-6 with 0=Sun or Sun-Sat)
#|   |    |   |   |   commands
#|   |    |   |   |   |
#### refresh squid's anti-ad server list
35   5    *   *   */3 /scripts_dir/ad_servers_newlist.sh >> /dev/null 2>&1

2019年7月8日 星期一

Distribute Certificates to Client Computers by Using Group Policy

You can use the following procedure to push down the appropriate Secure Sockets Layer (SSL) certificates (or equivalent certificates that chain to a trusted root) for account federation servers, resource federation servers, and Web servers to each client computer in the account partner forest by using Group Policy.
Membership in Domain Admins or Enterprise Admins, or equivalent, in Active Directory Domain Services (AD DS) is the minimum required to complete this procedure. Review details about using the appropriate accounts and group memberships at Local and Domain Default Groups (http://go.microsoft.com/fwlink/?LinkId=83477).

To distribute certificates to client computers by using Group Policy

  1. On a domain controller in the forest of the account partner organization, start the Group Policy Management snap-in.
  2. Find an existing Group Policy Object (GPO) or create a new GPO to contain the certificate settings. Ensure that the GPO is associated with the domain, site, or organizational unit (OU) where the appropriate user and computer accounts reside.
  3. Right-click the GPO, and then click Edit.
  4. In the console tree, open Computer Configuration\Policies\Windows Settings\Security Settings\Public Key Policies, right-click Trusted Root Certification Authorities, and then click Import.
  5. On the Welcome to the Certificate Import Wizard page, click Next.
  6. On the File to Import page, type the path to the appropriate certificate files (for example, \\fs1\c$\fs1.cer), and then click Next.
  7. On the Certificate Store page, click Place all certificates in the following store, and then click Next.
  8. On the Completing the Certificate Import Wizard page, verify that the information you provided is accurate, and then click Finish.
  9. Repeat steps 2 through 6 to add additional certificates for each of the federation servers in the farm.