2020年5月26日 星期二

DHCP MAC address Filter management made easy with DHCP PowerShell

Security and network administrators are increasingly wary of internal security threats, in addition to threats from the outside, due to the introduction of uncertified hardware and software on the network, such as personal portable computers and mobile devices that can be potentially compromised and not compliant to the security practices of the organization. Link layer-based filtering for Dynamic Host Configuration Protocol (DHCP) introduced in Windows Server 2008 R2 enables administrators to control network access based on media access control (MAC) address, providing a low-level security method. The link layer filtering controls allow the administrator to specify which MAC addresses are allowed on the network and which are denied access. You can use wild cards to allow or deny network access based on vendor MAC prefixes.
DHCP PowerShell introduced in Windows Server 2012 makes it very easy and seamless for admins to manage Link Layer filtering for IPv4 clients.
Following cmdlets are provided to manage Link Layer Filtering in DHCP Server:
Get-DhcpServerv4FilterList: Gets the enabled/disabled state of allow and deny filter list set.
Set-DhcpServerv4FilterList: Enables/Disables the allow and the deny MAC address filter lists.
Get-DhcpServerv4Filter: Gets the list of all MAC addresses from the allow and/or the deny list.
Add-DhcpServerv4Filter: Adds one or more MAC address filters to the allow or deny list.
Remove-DhcpServerv4Filter: Removes the specified MAC address or MAC address pattern from the allow list or the deny list of the DHCP server.
If you wan to add a large list of MAC addresses to the allow or deny filter list, an input text file in CSV format can be used to provide the MAC address filter list to be configured on the DHCP server. This data can be easily pipelined to Add-DhcpServerv4Filter cmdlet to add the complete list to the DHCP Server. The input text file (filter.csv in the example used later) containing the MAC address filters should be of the following format -
List,MacAddress,Description
Allow,1a-1b-1c-1d-1e-1f,Filter for Computer1
Allow,2a-2b-2c-2d-2e-2f, Filter for Computer2
Deny,3a-3b-3c-3d-3e-3f, Filter for Computer3
Allow,4a-4b-4c-4d-4e-4f, Filter for Computer4
The following command adds all these filters to the local DHCP Server.
Import-Csv Filter.csv | Add-DhcpServerv4Filter -Force
The Import-Csv cmdlet converts each data record in filter.csv to an object containing List, MacAddress and Description as members of the object. Each object created by Import-Csv is sent through the pipeline to Add-DhcpServerv4Filter which adds the MAC address records to the filter list on the DHCP server.
‘-Force’ parameter ensures that if a filter by same MAC address already exists, it is over-ridden. If ‘-Force’ parameter is not given and MAC address being added to the list already exists in the list on the DHCP server, the cmdlet will return an error.
In case, filters need to be added to DHCP Server running on remote machine, ‘-ComputerName’ parameter can be used to specify remote DHCP Server. Without the ComputerName parameter, as in the example above, the filters will be added to the DHCP server running on the local computer.


Oneway sync DHCP filter 

list It looks like you can do a Get-DhcpServerv4FilterList and a Set-Dhcpv4FilterList. Schedule this in a Powershell script and you have a one-way sync.
2020年5月21日 星期四

RD Gateway


Setup step by step

ref: https://turbofuture.com/computers/How-To-Configure-a-Remote-Desktop-Client-To-Use-a-Remote-Desktop-Gateway

https://www.sciencedirect.com/topics/computer-science/gateway-server

https://www.youtube.com/watch?v=sKW4pg0LcqE

https://www.google.com/search?q=rd+gateway+congratulations+step+by+step&oq=rd+gateway+congratulations+step+&aqs=chrome.1.69i57j33.9479j0j7&sourceid=chrome&ie=UTF-8

https://thewolfblog.com/2014/02/13/deploying-the-rd-gateway-service-role-in-a-2012-2012-r2-rds-farm/

https://systemcenter.wiki/?GetElement=Microsoft.Windows.Server.10.0.RemoteDesktopServices.NewUnitMonitor_7&Type=UnitMonitor&ManagementPack=Microsoft.Windows.Server.2016.RemoteDesktopServices&Version=10.0.5.0&Language=CHT

https://docs.microsoft.com/zh-tw/windows-server/remote/remote-desktop-services/troubleshoot/cannot-authenticate-or-must-authenticate-twice

https://www.thesslstore.com/knowledgebase/ssl-install/how-to-install-an-ssl-certificate-on-a-remote-desktop-gateway-server/


Port 443 to use

Generate a Self Signed Certificate with the Correct Common Name

ref:https://blog.miniasp.com/post/2010/09/02/Useful-tool-IIS6-Resource-Kit-Tools-and-SelfSSL


Generate a Self Signed Certificate with the Correct Common Name

This step is only required if you want to get rid of the warning message displayed because the common name on the self signed certificate doesn't match the website's hostname. In order to resolve this problem, we'll need to create the self signed certificate using the same method that is used to create a self signed certificate in IIS 6.0 (with SelfSSL instead of through IIS).
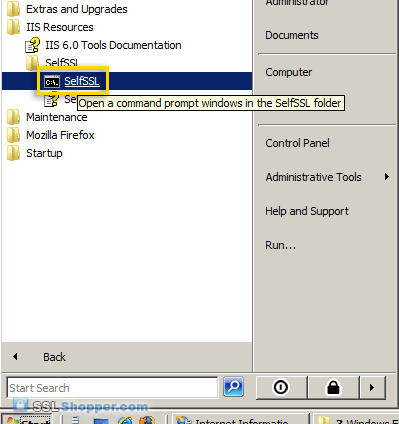
  1. Download the Internet Information Services (IIS) 6.0 Resource Kit Tools and install SelfSSL 1.0 (if you do a Custom install you can uncheck everything except for SelfSSL). Once it is installed, click on the Start menu, go to IIS Resources, then SelfSSL, and run SelfSSL.
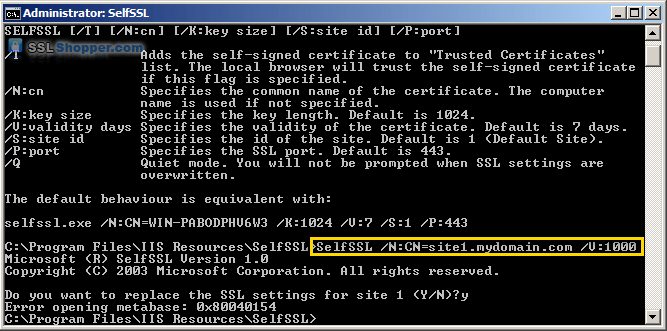
  2. Paste in the following command and replace site1.mydomain.com with the hostname of your IIS site. If you receive the erorr "Error opening metabase: 0x80040154", just ignore it. We will be manually binding the certificate to the website.
    SelfSSL /N:CN=site1.mydomain.com /V:1000
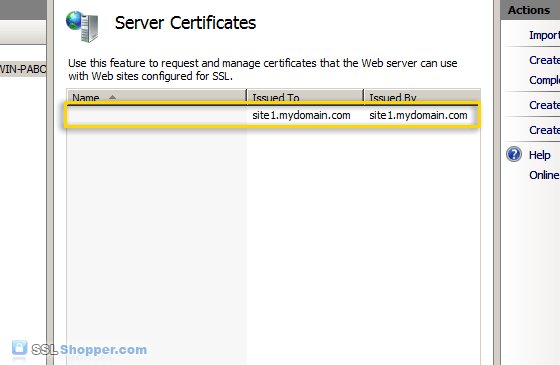
  3. After the command is finished, you will have an IIS self signed certificate with the correct common name listed in the Server Certificates section of IIS. Now follow the instructions above to bind the certificate to your IIS website.
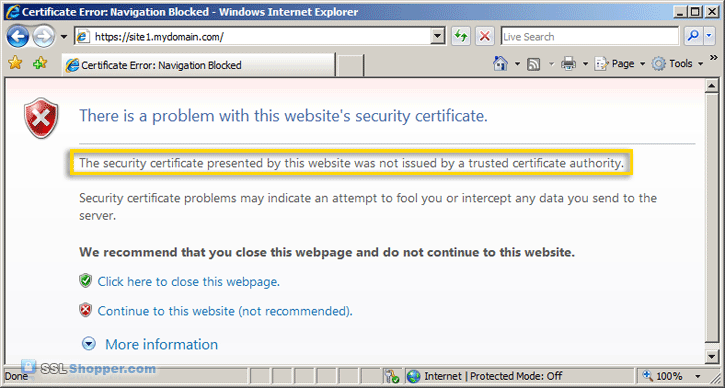
  4. After you have bound the new certificate to your IIS site, visit it with https in your web browser and you will encounter another error: "The security certificate presented by this website was not issued by a trusted certificate authority." (the SSL Certificate Not Trusted error)
    Don't worry; this is the last error we will need to fix. This is a normal error for self signed certificates because the certificate is signed by itself instead of a trusted SSL provider. All visitors to the site will see that error unless they import the self-signed certificate into their Trusted Root Certification Authorities store (or the appropriate SSL certificate store for the browser they are using). You can easily add the IIS self signed certificate to the store on the server by following the the instructions below. If you need to import the certificate on another Windows machine, just follow the instructions on how to Move or copy an SSL certificate from a Windows server.

Add the Self Signed Certificate to Trusted Root Certificate Authorities

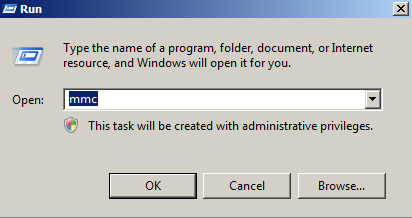
  1. Click on the Start menu and click Run.
  2. Type in mmc and click OK.
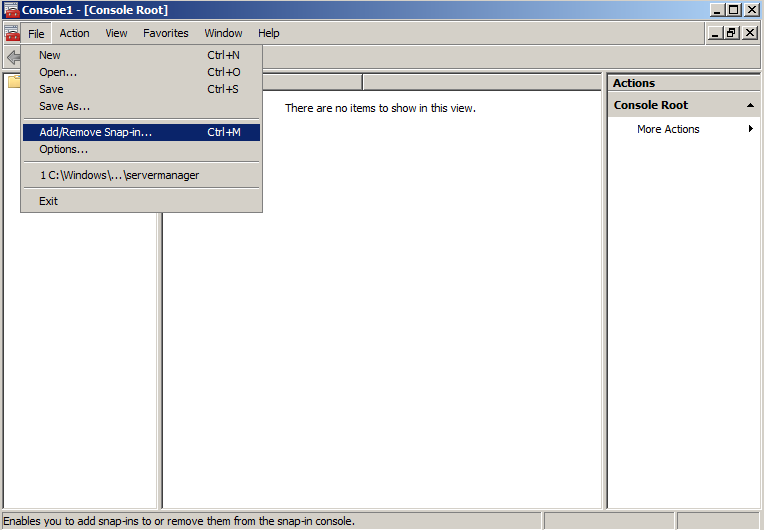
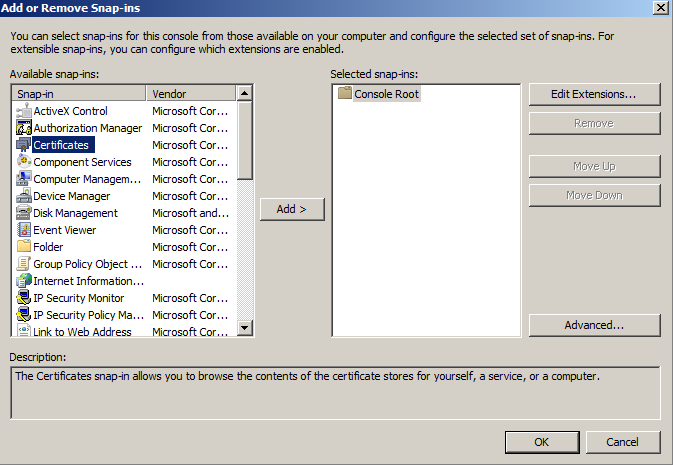
  3. Click on the File menu and click Add/Remove Snap-in...
  4. Double-click on Certificates.
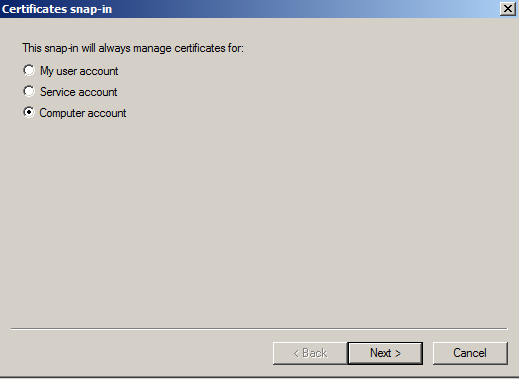
  5. Click on Computer Account and click Next.
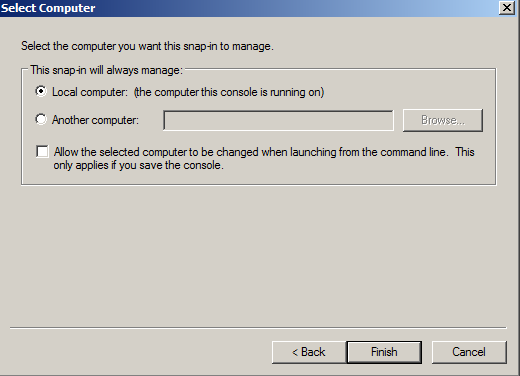
  6. Leave Local Computer selected and click Finish.
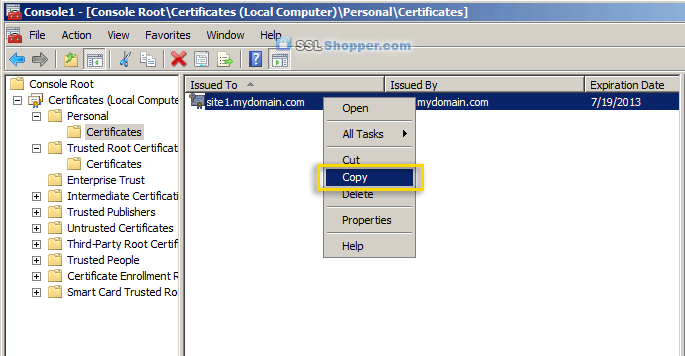
  7. Expand the Certificates item on the left and expand the Personal folder. Click on the Certificates folder and right-click on the self signed certificate that you just created and select Copy.
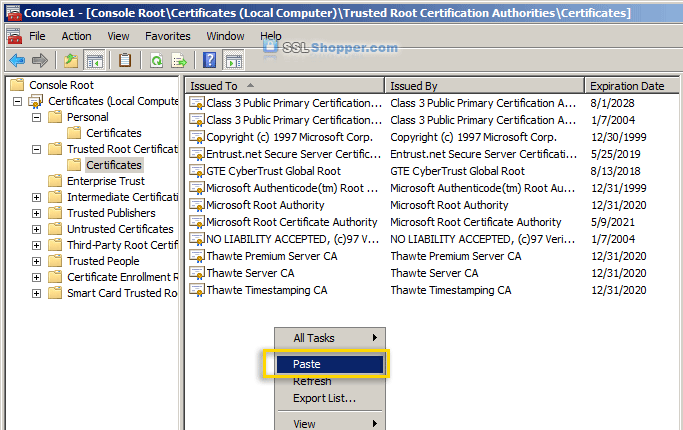
  8. Expand the Trusted Root Certification Authorities folder and click the Certificates folder underneath it. Right-click in the white area below the certificates and click Paste.
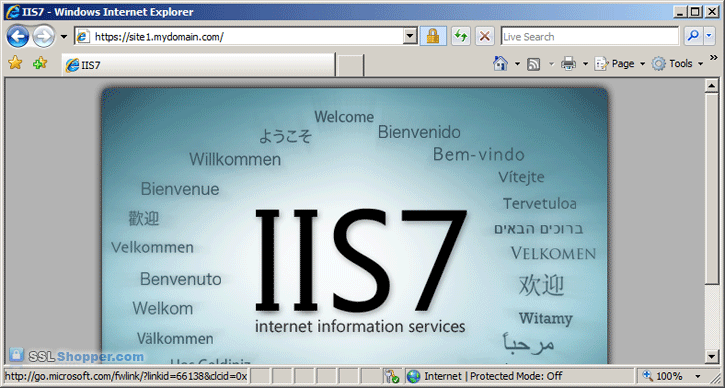
  9. Now you can visit your site with https in your web browser and you shouldn't receive any errors because Windows will now automatically trust your IIS self signed certificate.


介紹好用工具:IIS 6.0 Resource Kit Tools 與 SelfSSL 工具

要在 IIS 6.0 下安裝一個測試用的 SSL 憑證使用內建的工具可以說是非常麻煩的,不過 IIS 6.0 Resource Kit Tools 裡面有個 SelfSSL 工具可以非常快速且方便的幫你建立站台的 SSL 金鑰,並且直接將站台所有 SSL 相關設定都處理好,對於要進行 SSL 的安裝與測試來說非常的方便。
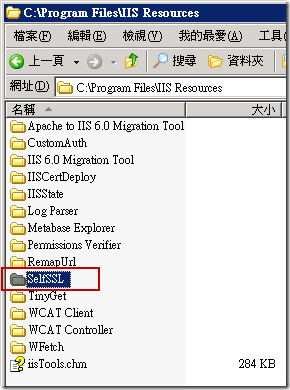
首先,當然是先把 IIS 6.0 Resource Kit Tools 安裝好,安裝好之後所有檔案會放在以下目錄:
C:\Program Files\IIS Resources
我們開啟命令提示字元並進入 SelfSSL 目錄裡輸入 SelfSSL.exe /? 查詢使用方式:
Microsoft (R) SelfSSL Version 1.0
Copyright (C) 2003 Microsoft Corporation. All rights reserved.

Installs self-signed SSL certificate into IIS.
SELFSSL [/T] [/N:cn] [/K:key size] [/S:site id] [/P:port]

/T               Adds the self-signed certificate to "Trusted Certificates"
                 list. The local browser will trust the self-signed certificate
                 if this flag is specified.
/N:cn            Specifies the common name of the certificate. The computer
                 name is used if not specified.
/K:key size      Specifies the key length. Default is 1024.
/V:validity days Specifies the validity of the certificate. Default is 7 days.
/S:site id       Specifies the id of the site. Default is 1 (Default Site).
/P:port          Specifies the SSL port. Default is 443.
/Q               Quiet mode. You will not be prompted when SSL settings are
                 overwritten.

The default behaviour is equivalent with:

selfssl.exe /N:CN=WIN2K3ENTSP2 /K:1024 /V:7 /S:1 /P:443
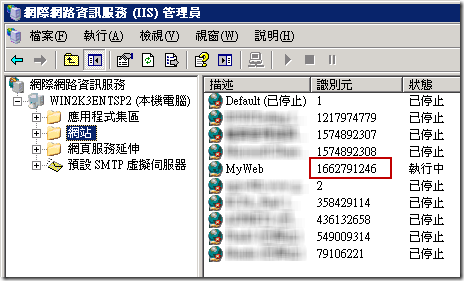
要使用 SelfSSL.exe 工具之前必須先找出網站的 ID ( 識別元 ),以下圖為例 SiteID 為 1662791246
假設我們要替 SiteID = 1662791246 建立一組為期 30 天的自我簽署憑證,只要輸入以下指令即可:
selfssl.exe /S:1662791246 /V:30
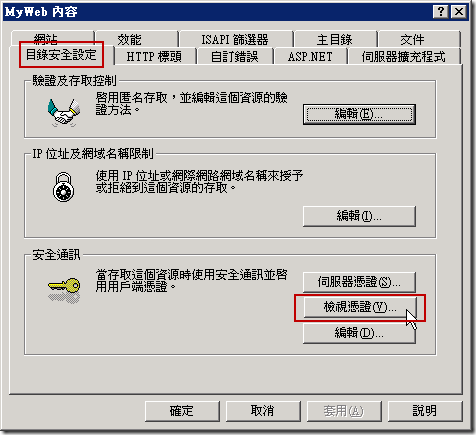
只要執行完成後所有複雜的設定就都全部完成了,你可以從站台屬性的地方切換到「目錄安全設定」的「安全通訊」區段看到「檢視憑證」按鈕,這就代表憑證已經成功安裝完成了。
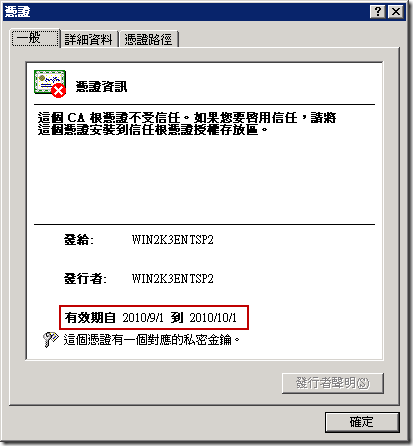
點開來看就可以看到憑證的到期日為 30 天後:

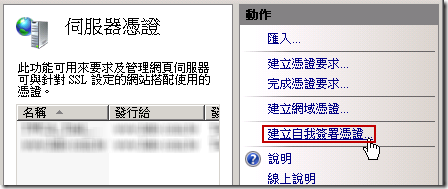
若使用 IIS7 的話,其實已經內建了「建立自我簽署憑證」的功能,所以不需要使用 SelfSSL 工具來設定

2020年5月17日 星期日

Fix: The trust relationship between this workstation and the primary domain failed

Refer:

Fix: The trust relationship between this workstation and the primary domain failed


There are two ways how can you manage your client and server machines in home or business environment, including Workgroup and Domain infrastructure. The workgroup is decentralized network infrastructure used for home and small business networks up to 10 machines. Workgroup does not require a dedicated server for managing machines, every machine has a different user account. On another side, domain infrastructure is centralized network infrastructure which supports thousands of machines. For the implementation of domain infrastructure, you will need to purchase minimum one server which will act as Active Directory Domain Services and Domain Name Services. After you implement AD DS and DNS you will need to join all machines in the network to your domain and create domain user accounts for every user. Next time, the user will log on using domain user account, and not the local user account. There are a lot of benefits by using domain infrastructure, including centralized and simplified management, fault tolerance, one user account for many services, and others. Few users encouraged problem when logging to the domain, including error: The trust relationship between this workstation and the primary domain failed.
This issue occurs on client and server operating system, from Windows XP to Windows 10 and from Windows Server 2003 to Windows Server 2016. There are different reasons why this issue occurs, including a problem with a user account, the problem with the relationship between client and domain server and others. For this article, I created domain infrastructure appuals.com on Windows Server 2008 R2 and Windows Server 2016.

There are seven methods which will help you to solve this issue.

Method 1: Check DHCP configuration

Did you add new DHCP server or reconfigure your current DHCP pool? If not, please read next method. If yes, please continue reading this method. There are two ways how you can assign IP addresses to hosts in your computer network, including static and dynamic addressing. Static addressing is manually assigning IP addresses to your machines which consume much more time and decrease the productivity of IT Administrator. We are recommending you to use dynamic addressing using DHCP (Dynamic Host Computer Protocol) protocol. The best practice will include static addressing for servers, storage and network printers, and dynamic addressing to other hosts in the network. Few users encouraged problem after they added another DHCP server in the current network. The problem was wrong DHCP pool for hosts in the network. Based on that, we are recommending you to check is DHCP working properly and are you using right network subnet. We will show you how to check DHCP on Windows Server 2016 and router TP-Link TL-ER6120. Imagine, the right network is working in C class, 192.168.1.0/24. So, let’s start.
  1. Hold Windows logo and press R
  2. Type dhcpmgmt.msc and press Enter to open DHCP Management tool
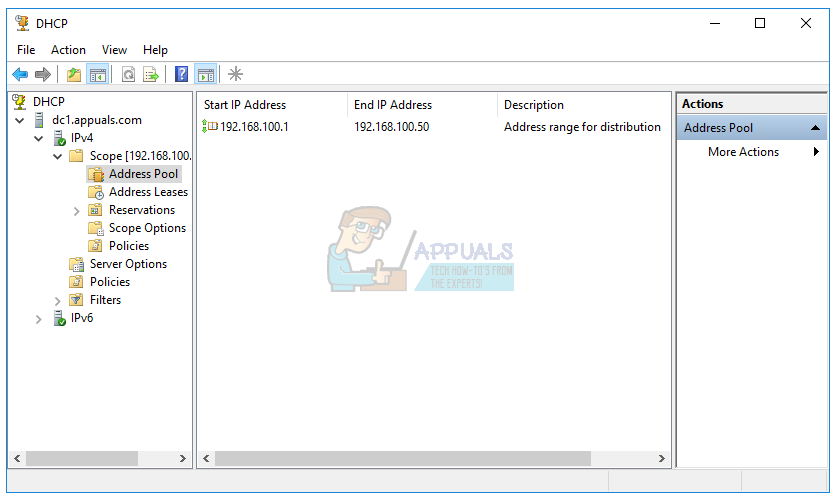
  3. Expand your server as following appuals.com\IPv4\Scope. As you can see this DHCP is not configured properly. Our network is 192.168.1.0/24, and configured network is 192.168.100.1/24. In that case, you will need to change DHCP configuration.
  4. Close Device Management
In the second example, we will show you how to check DHCP configuration on TP-Link router. If you do not know how to access your router, please read the technical documentation of your router.
  1. Open Internet browser (Google Chrome, Mozilla Firefox, Edge or other)
  2. Type router IP address to access router
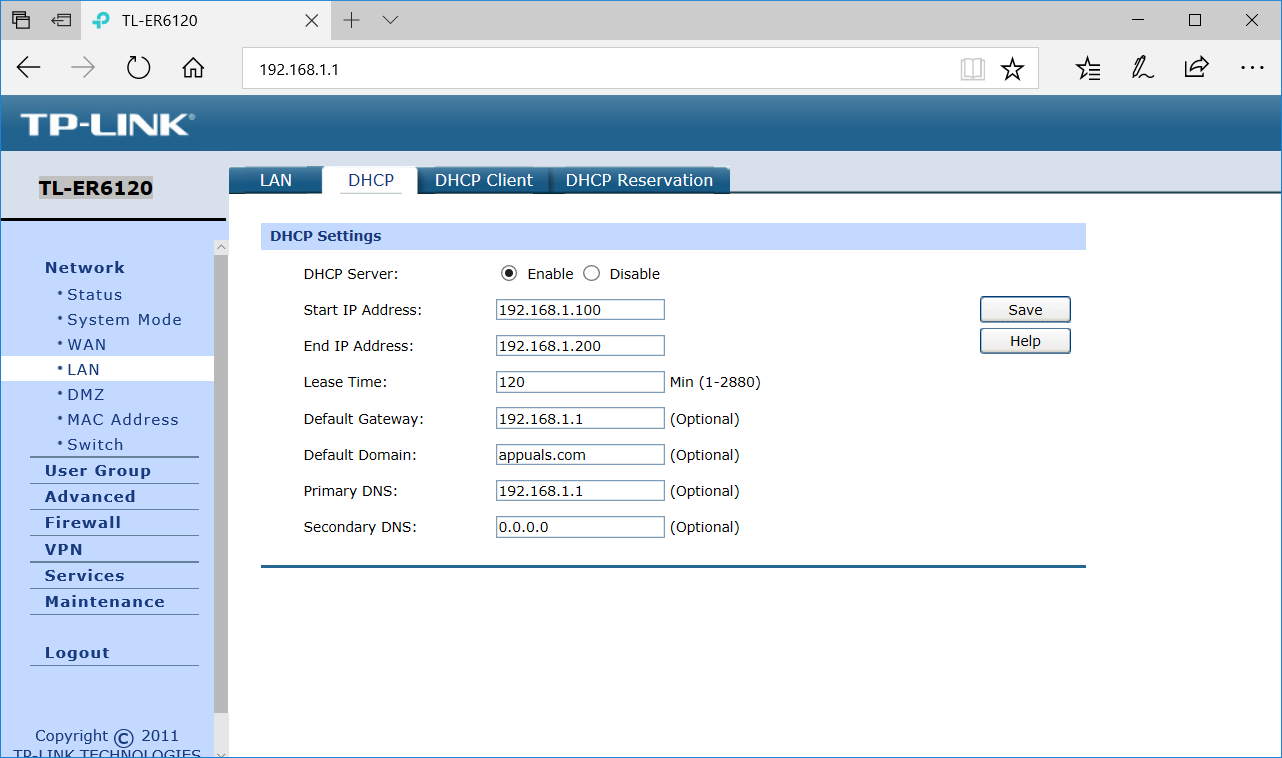
  3. Under Network tab choose LAN, and then DHCP to check your DHCP configuration. In our example, DHCP is enabled and configured as following 192.168.1.100 – 192.168.1.200, which is OK.
  4. Close Edge

Method 2: Rejoin a Computer from a Domain

In this method, you will need to rejoin your client machine from a domain. For this action, you need to use Domain Administrator account which has permission to do changes like join or rejoin machine from the domain. We will show you how to rejoin Windows 10 Pro from Windows Server 2016 Standard. The same procedure is compatible with other client and server operating system, including client operating system from Windows XP to Windows 8 and server operating system from Windows Server 2003 to Windows Server 2012 R2.
  1. Log on Windows 10 using local Administrator account
  2. Hold Windows logo and press E to open File Explorer
  3. On the right side of the File Explorer right click on This PC and choose Properties
  4. Click Advanced System Settings
  5. Choose Computer Name tab
  6. Click Change to add machine to Workgroup
  7. Choose Workgroup and type Workgroup In our example, the Workgroup name is WORKGROUP. You can type whatever you want.
  8. Click OK
  9. Type domain Administrator account and password and then click OK
  10. Click OK and then OK
  11. Close System Properties
  12. Restart your Windows machine
  13. Log on Windows 10 using local Administrator account
  14. Hold Windows logo and press E to open File Explorer
  15. On the right side of the File Explorer right click on This PC and choose Properties
  16. Click Advanced System Settings
  17. Choose Computer Name tab
  18. Click Change to add machine to domain
  19. Choose a domain and type the domain In our example it is appuals.com.
  20. Click OK
  21. Type domain Administrator account and password and then click OK
  22. Click OK and then OK
  23. Close System Properties
  24. Restart your Windows machine
  25. Log on Windows 10 using domain user account
  26. Enjoy working on your machine

Method 3: Reestablish trust through PowerShell

In this method, we will reestablish trust between the domain controller and client using PowerShell. You will need to log on using a local Administrator account.
PRO TIP: If the issue is with your computer or a laptop/notebook you should try using Reimage Plus which can scan the repositories and replace corrupt and missing files. This works in most cases, where the issue is originated due to a system corruption. You can download Reimage by Clicking Here
  1. Log on Windows 10 using local Administrator account
  2. Click on Start menu and type PowerShell
  3. Right click on PowerShell and choose Run as Administrator
  4. Press Yes to confirm running as Administrator
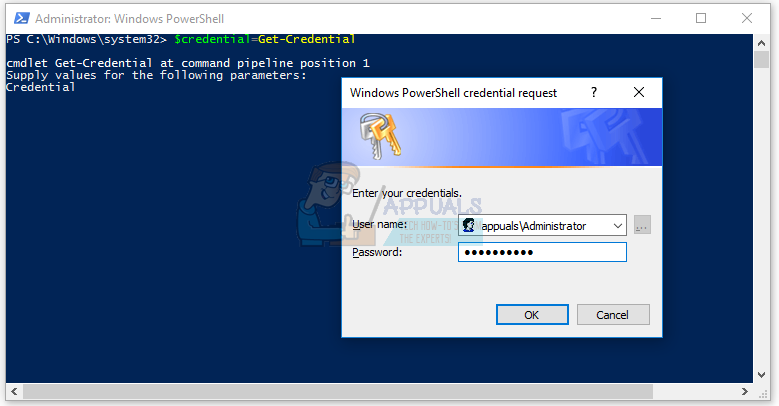
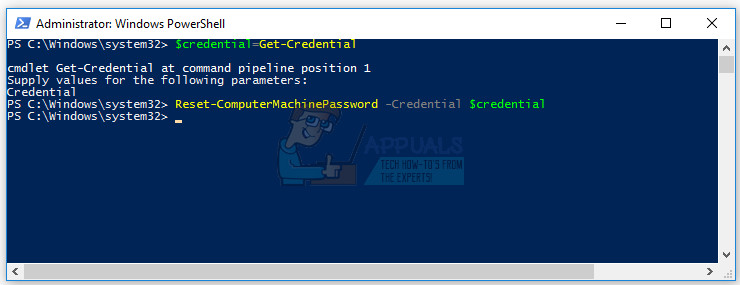
  5. Type $credential = Get-Credential and press Enter
  6. Enter domain admin account and password and then click OK
  7. Type Reset-ComputerMachinePassword -Credential $credential and press Enter
  8. Close PowerShell
  9. Restart your Windows machine
  10. Log on Windows 10 using domain user account

Method 4: Add domain controller to Credential Manager

In this method, you will use Credential Manager where you will add domain controllers account in Windows Credential. We will show you how to do in on Windows 10.
  1. Log on Windows 10 using local Administrator account
  2. Hold Windows logo and press R
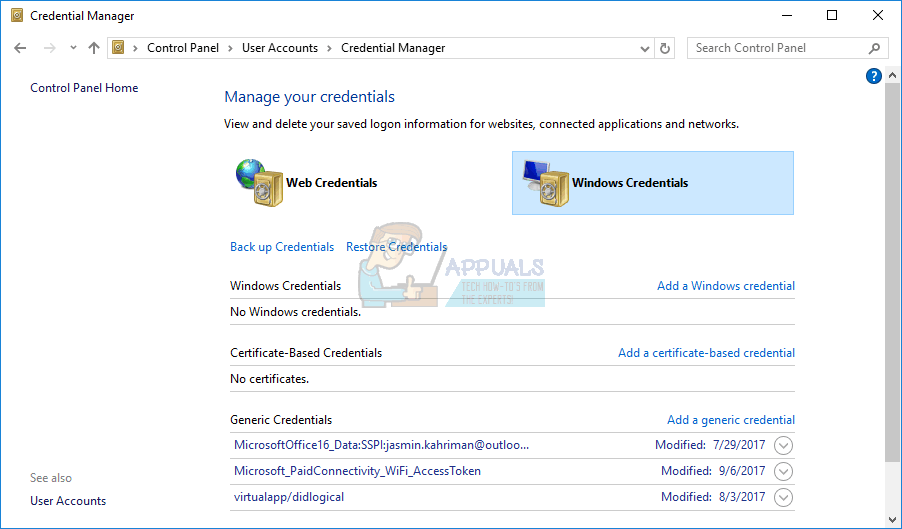
  3. Type control.exe /name Microsoft.CredentialManager and press Enter to open Credential Manager
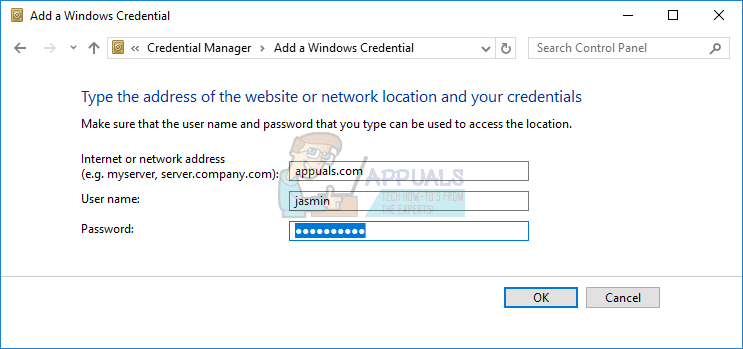
  4. Choose Windows Credential
  5. Type the address of the website or network location and your credentials
  6. Click OK
  7. Close Credential Manager
  8. Restart your Windows machine
  9. Log on Windows 10 using domain user account

Method 5: Use Netdom.exe to Reset a Machine Account Password

This method is compatible with Windows Server 2003 and Windows Server 2008 R2. If you are using a newer version of server operating systems, please read next method. We will show you how to reset a machine account password on Windows Server 2008 R2.
  1. Log on Windows Server using domain Administrator account
  2. Hold Windows logo and press R
  3. Type cmd and press Enter to open Command Prompt
  4. Type netdom resetpwd /s:server /ud:domain\User /pd:* and press Enter, where s is the name of domain server, domain is domain name and User is user account which can not connect to domain controller
  5. Close Command Prompt
  6. Move to Windows client machine
  7. Restart Windows machine
  8. Log on Windows machine using domain user account
  9. Enjoy working on your machine

Method 6: Reset Computer Account

In this method, you will need to reset computer account using Active Directory User and Computers tool which is integrated into servers with Active Directory Domain Services role. The procedure is simple and compatible with server operating systems from Windows Server 2003 to Windows Server 2016.
  1. Hold Windows logo and press R
  2. Type dsa.msc and press Enter to open Active Directory User and Computers
  3. Expand domain name. In our example it is appuals.com
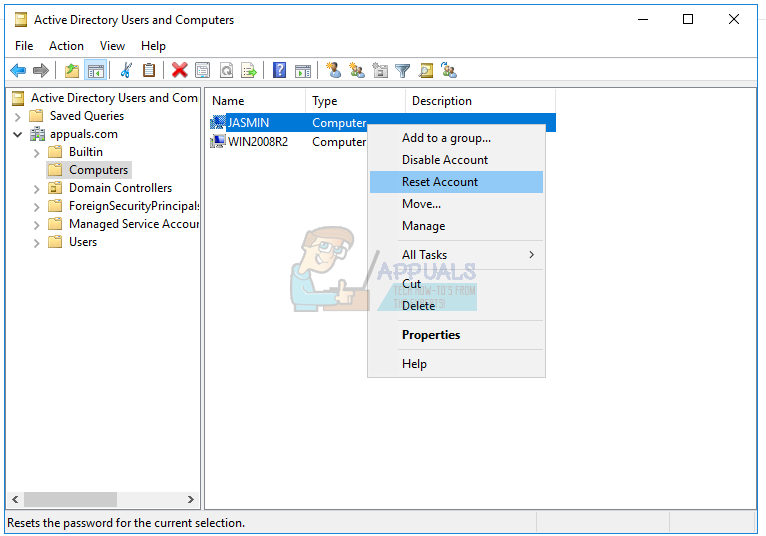
  4. Choose Computer
  5. Navigate to the computer account which can not connect to a domain. In our example, it is computer Jasmin
  6. Right click on computer (Jasmin) and choose Reset Account
  7. Click Yes to confirm resetting computer account
  8. Click OK
  9. Close Active Directory User and Computers
  10. Restart Windows 10 machine
  11. Log on to your domain user account
  12. Enjoy working on Windows machine

Method 7: Perform a System Restore

We talked so much time about System Restore because it helped us so many times in troubleshooting issues with system or application. Also, system restore can help you to solve the issue with reverting your system to the previous state when everything worked properly. Please note that you can not restore your Windows machine to the previous state if System Restore is turned off. Please read how to perform a System Restore.